
Getting Started with Your S1F2 Payment Terminal
Follow these detailed steps to set up your new S1F2 payment terminal provided by TapaPay. Each step is explained to ensure your terminal is ready for use as quickly as possible.
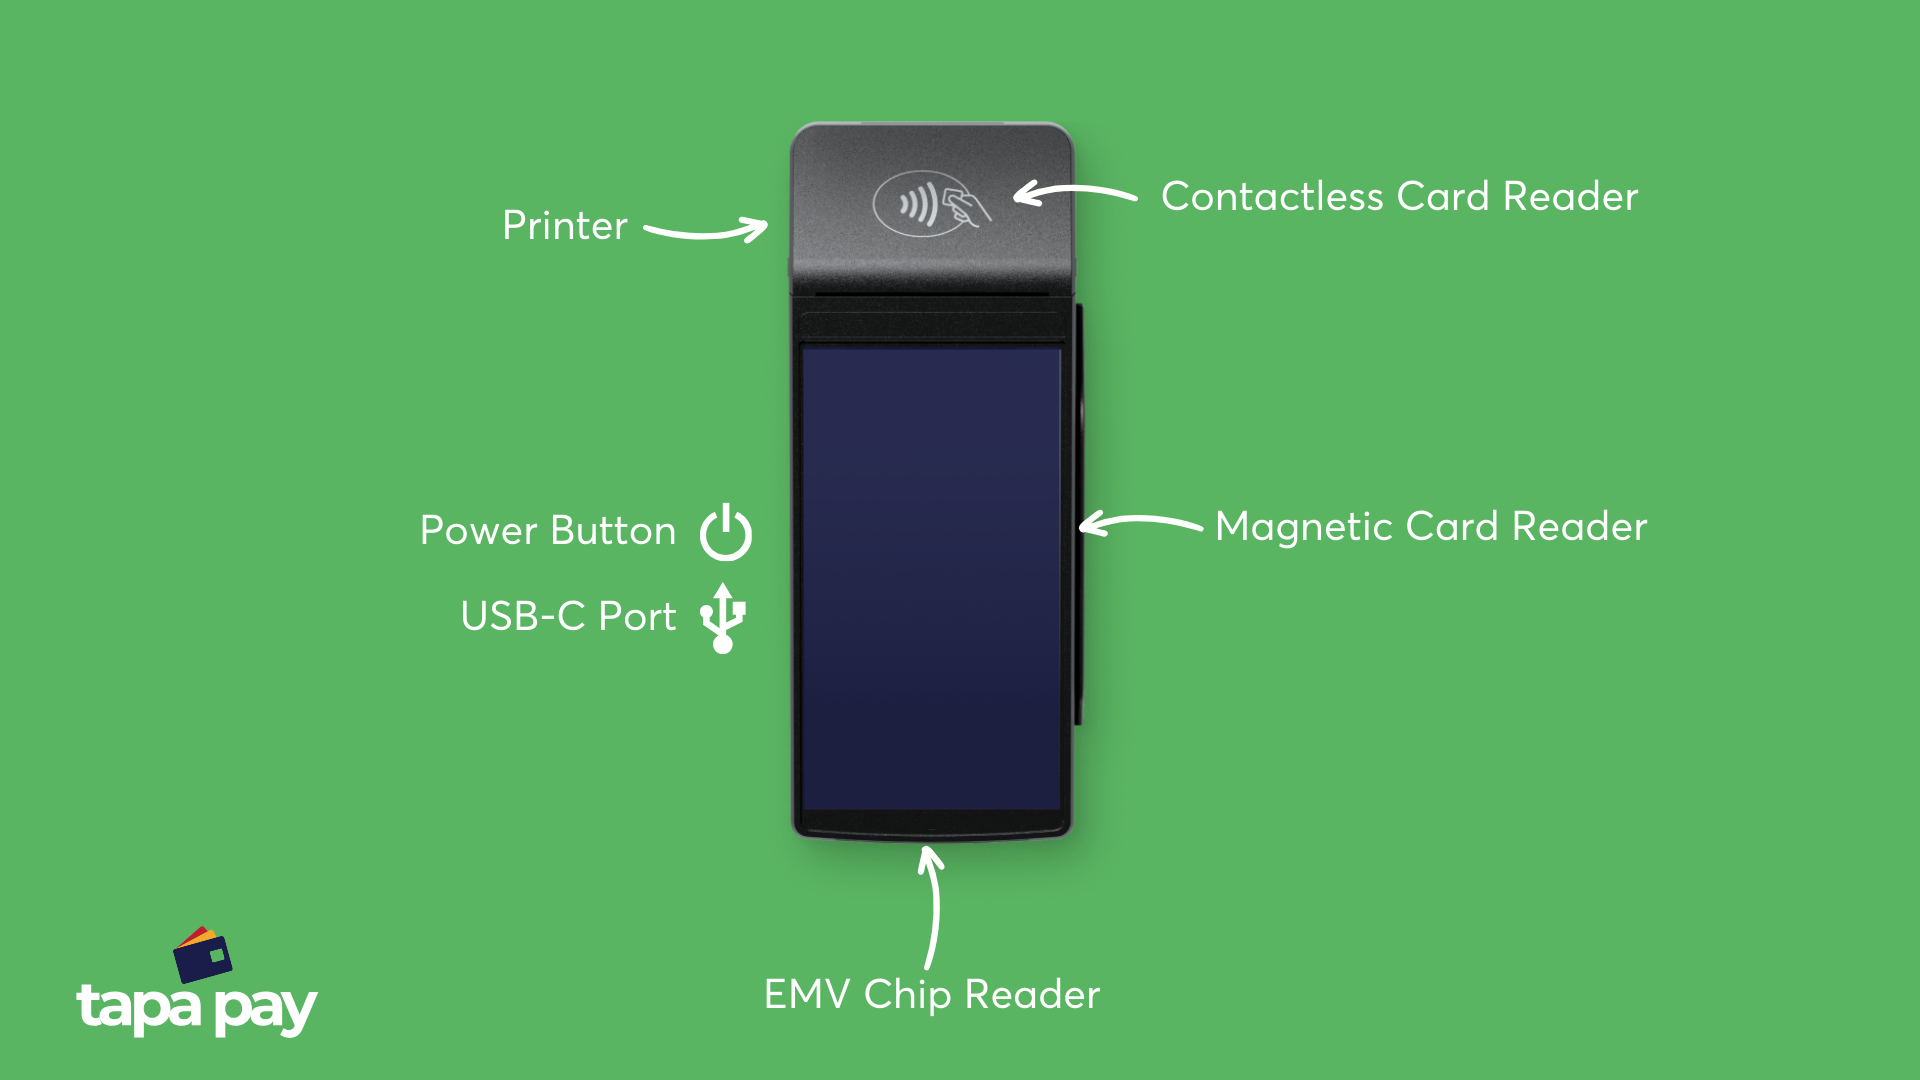
Supplied components
S1F2 payment terminal
S1F2: standard version
S1F2L: has a barcode scanning camera
USB cable and region-specific power plug for charging
SIM card
Receipt paper roll
Step 1: Inspect the Terminal
Before you begin using the terminal, it's essential to ensure it’s in good working condition and hasn’t been tampered with, as it will handle sensitive card data.
Check the packaging: Confirm that the packaging hasn’t been opened or damaged.
If you notice any signs of tampering, such as broken seals or unusual marks, do not use the terminal.
Verify the serial number:
The terminal’s serial number (S/N) is located on both the packaging and the terminal itself. Verify that the serial numbers match.
If your account with RST EPoS allows, log into your Customer Area under In-person Payments > Orders and Returns to verify that the serial number matches the record for your order.
Inspect for physical tampering:
Take the terminal out of the box and inspect it closely. Look for any missing screws, additional wiring, labels, or any signs of foreign objects inserted into or attached to the device.
Pay special attention to the card reader slots, ports, and casing for any irregularities.
Note: If you detect any issues or signs of tampering, contact RST EPoS Support immediately before proceeding.

Step 2: Insert the Receipt Paper Roll
For your terminal to print receipts, you’ll need to insert the paper roll correctly:
Open the paper roll compartment:
Gently pull up the cover of the compartment where the receipt paper goes.
Insert the paper roll:
Place the roll inside the compartment, ensuring the paper is positioned to roll out from underneath. Make sure the roll is placed the right way round, with the paper feeding out over the top, not from underneath.
Close the compartment:
After inserting the paper, close the compartment cover securely.
Test the roll:
Tear off a small piece of paper to ensure the paper is feeding correctly and easily accessible for printing.

Step 3: Powering On the Terminal
Connect the terminal to a power supply:
Plug the terminal into the wall using the USB-C charging cable provided by RST EPoS.
Turn on the terminal:
Press and hold the power button (usually on the side or top of the terminal) until the display turns on.
If the terminal doesn't power on immediately, leave it connected to the power supply for a few minutes to charge the battery, then try again.
Charge the battery:
It is recommended to let the battery charge for at least four hours while setting up the rest of the terminal to ensure long battery life.
A battery icon at the top of the display will show the charge level.

Step 4: Set Your Language Preferences
After powering on the terminal, you'll be greeted with the Welcome screen:
Select your preferred language:
Scroll through the language options and choose the one that best suits your needs by pressing the corresponding language button.
Press the Next arrow

Step 5: Connect to Your Network
For the terminal to process payments, it must be connected to the internet. You can use either a Wi-Fi connection or the pre-installed SIM card for cellular connectivity.
Connecting to Wi-Fi:
Go to Wi-Fi setup:
After selecting your language, you'll be prompted to set up your network connection. Select the arrow button to proceed to the Wi-Fi setup screen.
Add a network:
On the Setup Wi-Fi screen, select the + sign to add a new network.
Turn on Wi-Fi:
Make sure the WLAN toggle switch is turned on.
Select a network:
Choose your network from the list displayed, or manually add the network name (SSID) if it doesn’t appear in the list.
Enter the Wi-Fi password:
Input your network password, then select OK to confirm.
Connection confirmation:
Once connected, a Wi-Fi icon will appear at the top of the display, indicating a successful connection.
Note: For environments where Wi-Fi is not available or reliable, the terminal is equipped with a cellular failover system (see below).


Cellular 3G/4G Failover:
Automatic cellular backup:
If your terminal loses its Wi-Fi connection, it will automatically switch to the cellular network. This ensures you can continue processing payments without disruption.
SIM card activation:
Your terminal comes with a pre-installed and activated SIM card. However, if the SIM card was not activated during initial setup, contact RST EPoS Support for assistance.
Step 6: Terminal is Ready for Payments
After completing these steps, your terminal is ready to process payments. Follow these instructions to process payments:
Standalone payments: For standalone use (without a POS system), simply press the Payment button to initiate transactions.
POS integration: If connected to a POS system, payments can be processed directly through the POS interface.

Additional Features and Maintenance
Maintaining Battery Performance
To ensure your terminal’s battery remains in good condition:
Store the terminal in a cool, dry place away from direct sunlight.
Avoid overcharging by not storing the terminal with a full charge (keep the battery between 40% and 70% for long-term storage).
Inspect the battery regularly for signs of leakage or swelling.
If the battery becomes damaged, contact RST EPoS to arrange a replacement.
Using the USB-C Charging Cable
The S1F2 terminal comes with a USB-C charging cable. To prevent damage to the cable or terminal:
Insert and remove the USB-C cable by holding the connector end, not by pulling on the cable.
Avoid bending or twisting the cable excessively.
Regularly inspect both the cable and the USB-C socket on the terminal for foreign objects or damage.
If the terminal is used in high-humidity areas (e.g., kitchens or outdoor settings), consider using a charging station for extra protection.